
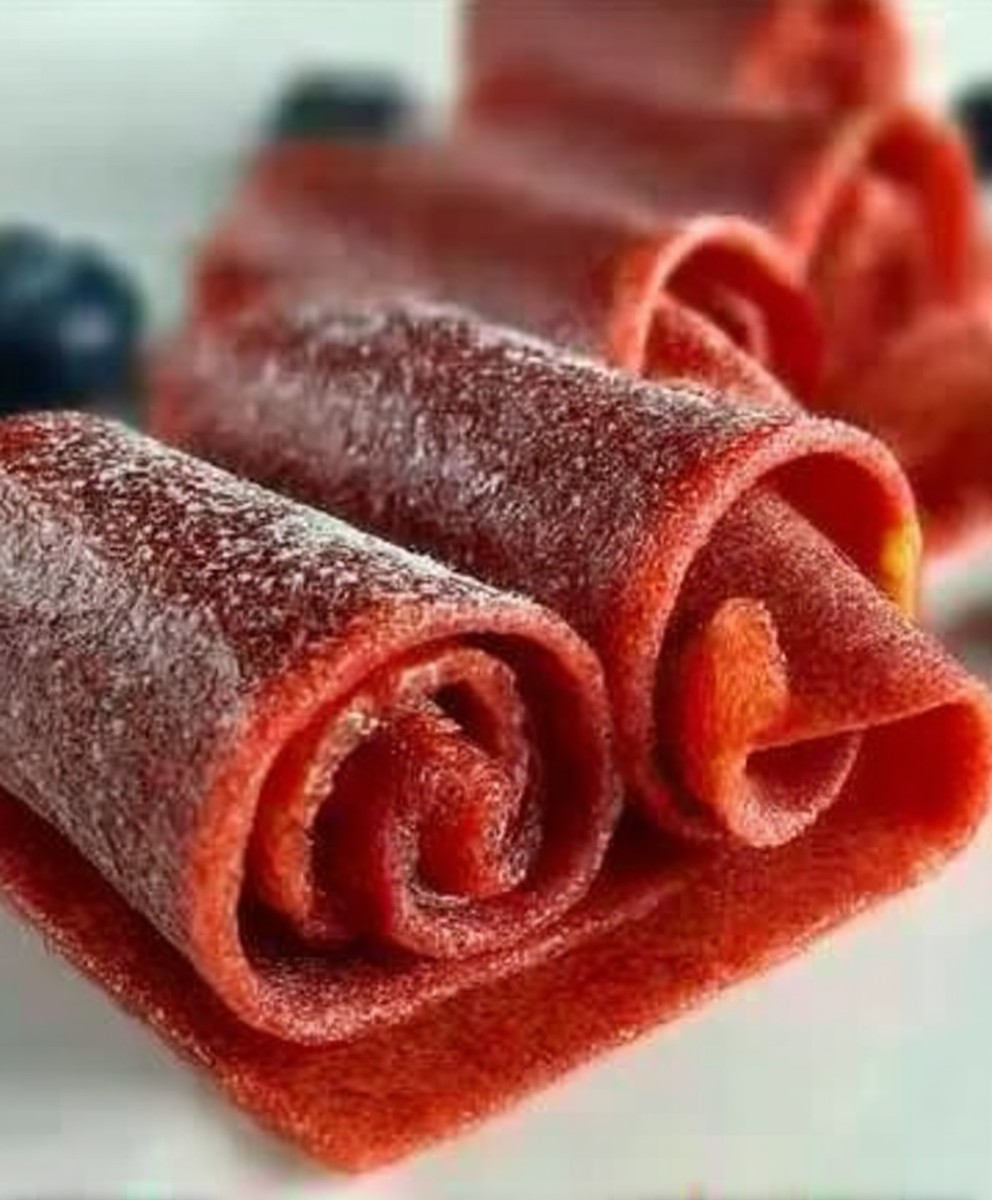
3-Ingredient Homemade Fruit Roll-Ups: The Sweet Secret to Happy Snacking!
Remember those glorious, vibrant sheets of fruit that magically unrolled into pure joy? The ones that left your fingers sticky but your heart happy? For years, I just assumed they were some kind of mystical factory creation, far beyond the reach of mere mortals in a home kitchen. Oh, how wrong I was! Turns out, recapturing that childhood magic with 3-Ingredient Homemade Fruit Roll-Ups is not only possible, but surprisingly simple, like discovering your favorite band from the 90s still makes great music. It’s an edible blast from the past, only better because you made it yourself!
My kitchen used to be a battleground of snack choices. On one side, the sugary, neon-colored store-bought options that made me wince at the ingredient list. On the other, my valiant but often ignored attempts at healthy alternatives. Then, a revelation! With just a few humble fruits and a dash of ingenuity, I unlocked the secret to perfectly chewy, naturally sweet fruit roll-ups. It’s the kind of recipe that makes you feel like a culinary wizard, even if your actual wizardry extends mostly to microwaving popcorn without burning it. Your kids will think you’re a superhero, and honestly, you might just start believing it too.
Seriously, ditch the lengthy ingredient lists and the questionable dyes. These 3-Ingredient Homemade Fruit Roll-Ups are a total game-changer for parents, snack enthusiasts, and anyone who cherishes a touch of nostalgia without the guilt. They’re infinitely customizable, so whether you’re a berry fanatic, a tropical fruit lover, or a mango maestro, your snack dreams are about to come true. Imagine the satisfaction of peeling back that first homemade strip, knowing exactly what went into it: pure, unadulterated fruit bliss, ready to be rolled, torn, and devoured. Get ready to impress yourself and everyone lucky enough to grab a piece!
- Transform simple, fresh fruits into delicious, chewy snacks with incredible ease, requiring minimal effort and no complicated steps.
- Enjoy a guilt-free treat free from artificial colors, added sugars, or preservatives often found in commercial fruit snacks, perfect for healthy eating.
- Unleash your creativity by experimenting with various fruit combinations to create unique flavor profiles tailored to your taste buds and family’s preferences.
- Recreate a beloved childhood classic right in your own kitchen, providing a fun, nutritious, and incredibly satisfying alternative to store-bought options.
Perfecting the Cooking Process
Achieving perfect 3-ingredient homemade fruit roll-ups relies on a precise process. Ensuring a velvety smooth consistency before preparation is crucial for even spreading and uniform dehydration. Following this, a low, slow drying method is essential. This sequence concentrates natural flavors while developing the ideal pliable, non-sticky texture, resulting in perfectly rolled, delicious fruit snacks every time.
Add Your Touch
Personalize your 3-ingredient homemade fruit roll-ups by experimenting with different fruits like berries, mango, or peaches, adjusting for sweetness. Introduce a pinch of cinnamon, cardamom, or a few drops of vanilla bean paste for aromatic depth. A touch of citrus zest can also brighten the flavor profile, offering a delightful and unique twist to each batch.
Storing & Reheating
Store your 3-ingredient homemade fruit roll-ups in an airtight container at room temperature for up to two weeks, or refrigerate for extended freshness. While traditional “reheating” isn’t typical, if they become stiff, a brief exposure to very gentle warmth can slightly soften them, helping restore their pliable, enjoyable texture without compromising the delicious fruit flavor.
Expert Tips for Success
- Always ensure your base fruit mixture is completely smooth. Any remaining chunks can prevent uniform drying and result in a less appealing, inconsistent roll-up texture.
- Avoid drying at too high a temperature. This can scorch the fruit, leading to a brittle, hard texture and diminishing its vibrant color and natural sweetness.
- Once dried, allow roll-ups to cool completely before cutting and rolling. This prevents sticking and ensures they maintain their shape and pliability during storage.
Frequently Asked Questions
How long do 3-Ingredient Homemade Fruit Roll-Ups last, and what’s the best way to store them?
Properly stored, these delightful fruit roll-ups can last up to 2-3 weeks at room temperature in an airtight container. For longer freshness, especially in humid climates, refrigeration can extend their life to a month. Ensure they are completely dry before rolling and storing to prevent stickiness and mold, making them a convenient snack option for longer periods.
What fruits are ideal for making these simple homemade fruit roll-ups?
Most high-pectin fruits work wonderfully, contributing to a good set. Berries like strawberries, raspberries, and blueberries are excellent choices, as are stone fruits such as peaches, apricots, and plums. Apples and mangoes also yield fantastic results. For best flavor and color, choose ripe, seasonal fruits, ensuring a naturally sweet and vibrant snack every time with just three ingredients.
Is it possible to make 3-Ingredient Homemade Fruit Roll-Ups without adding any sugar?
Absolutely! If your chosen fruits are naturally sweet and ripe, you often don’t need any added sugar at all. The “three ingredients” typically refer to fruit, a little lemon juice (for brightness and preservation), and sometimes a touch of sweetener if the fruit isn’t sweet enough. Prioritizing ripe fruit ensures a delicious and naturally sweet treat, making them a healthier snack alternative.
Conclusion for 3-Ingredient Homemade Fruit Roll-Ups
The allure of 3-Ingredient Homemade Fruit Roll-Ups lies in their remarkable simplicity and wholesome goodness. This easy-to-follow method transforms fresh fruit into a delightful, chewy snack that far surpasses store-bought versions in both flavor and nutritional value. With minimal effort, you can create a customizable treat, choosing your favorite fruits and controlling the sweetness. They offer a perfect solution for a healthy, portable snack for kids and adults alike, free from artificial colors or preservatives. Embrace the joy of crafting these vibrant, natural fruit roll-ups, providing a delicious and guilt-free indulgence that proves homemade is always best.
Print3-Ingredient Homemade Fruit Roll-Ups

Whip up wholesome 3-Ingredient Homemade Fruit Roll-Ups! Blend fresh fruit for vibrant, chewy snacks. A simple oven dehydration creates a healthy treat. Full instructions & nutrition details included.
- Prep Time: 15 minutes
- Cook Time: 20 minutes
- Total Time: 35 minutes
- Yield: 4 servings 1x
- Method: Stovetop
- Cuisine: American
Ingredients
- 4 cups fresh or frozen fruit (e.g., strawberries, mango, peaches), hulled or pitted
- 1 tablespoon fresh lemon juice
- 1–2 tablespoons honey or maple syrup (optional, adjust to fruit sweetness)
- 1–2 tablespoons water (if needed for blending)
- 2 sheets parchment paper
- 1 light coating non-stick cooking spray
- 1/8 teaspoon fine sea salt
Instructions
- Step 1: Preheat oven to its lowest setting (typically 170-200°F / 75-95°C). Wash and prepare your chosen fruit. In a blender, combine the prepared fruit, lemon juice, and salt. Blend until completely smooth. If the mixture is too thick to blend, add 1-2 tablespoons of water, one at a time, until smooth.
- Step 2: Taste the fruit puree. If your fruit isn't sweet enough, or you prefer a sweeter roll-up, add 1-2 tablespoons of honey or maple syrup and blend again until fully incorporated.
- Step 3: Line a large baking sheet (approximately 13×18 inches) with one sheet of parchment paper and lightly spray the parchment with non-stick cooking spray. Pour the fruit puree onto the prepared parchment paper and use an offset spatula or the back of a spoon to spread it evenly into a thin layer, about 1/8 to 1/4 inch thick, leaving a small border around the edges.
- Step 4: Place the baking sheet in the preheated oven and bake for 3-5 hours, or until the fruit puree is no longer sticky to the touch and feels firm, leathery, and pliable. The exact cooking time will vary depending on the fruit's water content and the thickness of your layer. It should peel easily from the parchment paper without tearing.
- Step 5: Remove the baking sheet from the oven and let the fruit leather cool completely on the sheet at room temperature. Once cool, carefully peel the fruit leather from the parchment paper.
- Step 6: Lay the fruit leather onto a fresh piece of parchment paper. Using kitchen shears or a pizza cutter, cut the leather into strips about 1 inch wide. Roll each strip up tightly with the parchment paper still attached. Store the fruit roll-ups in an airtight container at room temperature for up to 2 weeks, or in the refrigerator for longer.
Notes
- To keep your homemade fruit roll-ups perfectly pliable and delicious, store them in an airtight container at room temperature for up to two weeks, or extend their freshness by refrigerating for longer enjoyment.
- These fruit roll-ups are designed to be enjoyed as a cool or room-temperature snack; no reheating needed, as it might change their delightful leathery texture.
- Beyond a delightful snack, consider unrolling and chopping these fruit leathers to sprinkle over yogurt, granola, or even a scoop of vanilla ice cream for a vibrant, fruity topping!
- For the best results, remember that fruits with higher water content, like berries, will typically dry faster than denser fruits such as mango or peach, so keep a close eye on your oven to achieve that ideal leathery, non-sticky finish.
Nutrition
- Serving Size: 1 fruit roll-up (approx 15g)
- Calories: 30
- Sodium: 1mg
- Fat: 0.2g
- Saturated Fat: 0g
- Trans Fat: 0g
- Protein: 5g


Leave a Comment